Beautiful appliques of shapes help develop good thinking in young children. They have a positive effect on children's subconscious, thereby forming ideas about the outside world.
Before starting developmental activities, it is necessary to explain what geometric shapes are. They are the basis of an interesting activity. After some time, the child will learn to cut out paper elements on his own.

Our material presents detailed instructions and drawings for educational applications. Ready-made sketches help make the task easier. Based on their structure, the necessary elements are selected to create an unusual picture.

Classes should be selected based on the age category of your baby. For young children, it is best to choose applications consisting of 4-5 geometric shapes. The difference in color palette promotes good memorization and memory training.


Geometric applique "Transport"
How to make a geometric applique? It's actually quite simple. When choosing a task, it is recommended to familiarize yourself with your child’s preferences. For example, girls prefer flowers, birds, and animals. Boys most often choose cars, robots, etc.

As for the color combination, it is best for children with an impulsive character to choose light or pastel shades. They form maximum concentration and perseverance. In addition, such measures have a positive effect on the emotional state.

We present to your attention an application in the form of transport. It consists of simple geometric shapes. This activity will appeal to children aged 3 to 4.5 years. It creates hard work, perseverance and accuracy.

Before starting the work process, you need to prepare the following tools and materials:
- a simple pencil;
- ruler;
- PVA glue;
- scissors;
- colored paper;
- car image;
- brush.

The process of creating an application takes place in several simple steps:
- We begin to cut out the shapes that make up our “geometric” vehicle: a rectangle for the main part of the car body, circles for the wheels, a square for the roof. Before you start cutting out objects, you need to decide on their color scheme.
- Next, on a white sheet of paper, draw a road along which the transport will move. After that, glue a rectangle in the center. We glue a roof over it. Lubricate each element with a small amount of adhesive. When the roof and body are dry, you can move on to the wheels.

The application is almost ready. Here you can give free rein to your children's imagination. Let the child draw the doors and windows of his car himself.

Applications from geometric shapes “Animals”
This developmental technique is aimed at ages 5 to 6 years. At this time, the child already has a good idea of what shapes the body of a particular animal consists of. How to make a geometric applique for a child? Today we will glue the dog.

The paper structure contains: a head in the form of a circle, a body in the shape of an oval, paws made of small rectangles and ovals, and a neck in the form of a cylinder. To decorate the neck area, we will make a small bow from two triangles.

Before starting classes, you need to prepare the following tools:
- scissors;
- ruler;
- brush.

From the materials we will need:
- colored paper or cardboard;
- white sheet of paper in A4 format;
- glue in the form of a pencil.


Master class for geometric applications with your own hands goes through several stages:
Carefully cut out the geometric components of our craft. Next, we fix each element in its place. Experienced teachers recommend numbering each detail. This will allow the child to master counting and visual representation.

Lubricate the reverse side with adhesive. First we glue the head, then the rest of the animal’s body. The final step will be a beautiful bow in a bright color.


The photo of geometric applications shows drawings and sketches. Here you can choose an educational activity for your child based on his age and preferences.

Photos of geometric applications


There are many fun ways to fill time, but appliqué from geometric shapes will be one of the most entertaining hobbies because it allows you to create real masterpieces of art. Afterwards, it will be possible to decorate the interior of the home, creating a special atmosphere for relaxation or performing household chores.
Applications made from colored paper have gained great popularity in preschool and school educational institutions. It allows you to comprehensively develop a child’s skills, improving his basic abilities:
- motor skills;
- thinking;
- fantasy;
- dexterity;
- accuracy and others.
Types of applications
Depending on the type of projects or paper crafts created, this hobby can be divided into 2 types:

What can you make from geometric shapes from colored paper?
There is no single standard, as well as a program for teaching children, how to make various applications from colored paper, because each person’s imagination is very different.

The main task is to develop all the basic skills in them. In most cases, the teacher independently decides what pictures the children will make or gives them the opportunity to independently choose what they want to do. This is how not only motor skills develop, but also thinking, as the child chooses the character he likes.
Simple compositions
Learn simple ones first flat figures. For example, a train applique would be a great option for boys. It can be made up of somewhat regular geometric figures, which will be cut out by the teacher or the child himself, depending on age.

Children begin to confidently hold scissors in their hands only at the age of 5-6 years, and they begin to cut out complex figures. irregular shape in first grade. In fact, everything depends on the child’s development, his activity and abilities. That's why a train would be a great start.

It will require:
- 3 rectangles of different colors and sizes. 1 will become a platform, 1 – a driver’s cabin, 1 – a water tank;
- the semicircle will be the front of the tank;
- inverted isosceles triangle may become an exhaust pipe;
- a pair of circles - wheels;
- a long rectangle - a rod for eccentric connection of wheels.
The child learns from the presented materials to fold an image on a sheet of paper, spread glue evenly, and evenly combine the parts together. Fine motor skills, thinking, and imagination develop if you invite him to make a train without an example.
Another fairly simple version of a paper masterpiece is a bird applique. It will require one large circle for the body, a couple of semicircles for the wings, several small triangles for the legs and beak.

You can create pictures of various animals from geometric shapes, letting your child think for himself which one he can make.
Volumetric applique made of colored quilling paper
After developing the skills of creating flat compositions, they proceed to volumetric applications from colored paper. Such crafts will be more difficult to master, so they are used in teaching for older children. For example, in group 4 kindergarten or 1st grade. Guys with good abilities can be assigned to a circle.

In the first stages, it is better to master simpler volumetric compositions. For example, a house applique with cutting templates is a good option. The wall may be flat, but the windows, roof and exhaust pipe may be protruding.

The method of adding volume is used differently. Paper parts can be bent, or they can be glued on an additional leg onto a background of the same dimensions, creating a 3D effect with a shadow.
Butterfly applique is one of simple options, which many children can master, even when making a composition in volume.

To do this, you can cut out 2 identical parts. Glue one completely, and bend the second in half and glue it in the center. This is how you get wings. The head is formed from a circle, and the body from a strip.
Volumetric compositions from simple figures
For younger children, you can suggest making an applique from circles of colored paper. From them, if you have some imagination, both flat compositions on a white sheet and three-dimensional ones are made.

It will be good to develop with mugs abstract thinking, if you invite the child to perform an arbitrary picture.
When children's imagination is already somewhat developed, they move on to more difficult tasks. For example, mosaic applique is a good option for further development of skills.

Give your student a set of cuttings of different or the same shape so that he can come up with a composition on his own. If there are enough colors, you can get quite colorful pictures.
Cutting templates
If you don’t know where to start with your child’s development, then use a ready-made bunny template for appliqué or other animals.


There are many interesting sets with which you can comprehensively develop children's skills. In any case, all applications contribute to the formation of such qualities as:
- figurative and spatial thinking;
- perseverance;
- endurance;
- fantasy;
- manual dexterity and motor skills;
- accuracy.
As you reach a new level, the tasks for creating compositions can become more complex.
Dear moms and dads, what could be better than cutting and gluing figures, patterns or entire paintings from pieces of paper? It should be remembered that development creative thinking Children of any age benefit from varied, interesting, colorful and unusual applications made from colored paper. Using scissors, glue, colored paper and adding a little imagination, you and your child can create an original and unique application.
Application- cutting and gluing (sewing) figures, patterns or entire paintings from pieces of paper, fabric, leather, plant and other materials onto the base material (background). As a rule, the base material is cardboard, thick paper, and wood. The application is associated with cognitive activity and has a huge impact on the development of mental and creativity children.
Pig applique
All children love the fairy tale about the three little pigs. Do you want to revive it for your baby? Our website, which has an applique of a pig, will help you with this. You can use it easily. To do this, you just need to save the diagram that is provided on our website. How to save the scheme? Right-click on the diagram and click save rice how? This is a very easy craft to do, your little one can easily make it with their own hands. Therefore, give him this opportunity, even if he is a little unable to apply the piglets the first time, but this will also make the fairy tale humorous.


Cow applique
"Children, drink milk - stay healthy!" Is this phrase still just a phrase for your child? Does he really hate milk? Then create for him a fairy tale about how milk is made. To do this, you first need a cow. No, no, not alive at all, but an appliqué of a cow. Let your child make this craft with his own hands. For this, a diagram of how to make a cow applique will be very helpful, which you can simply download and print. After making such a craft, tell how a cow eats grass and produces milk, which is very useful for children. Make a cow applique and maybe the baby will soon ask for milk.


Cat applique
The cat applique is suitable for the smallest creators, as it has a very simple design.
First, let's prepare the necessary material:
Colored paper, scissors, glue, black marker and base sheet.
If you decide to make a cat the same color as ours, then you will need three shades of gray paper. From them you need to cut out two identical circles - this is the torso and the head. Then two semicircles - paws or base and tail. The two triangles will be the ears. There are two small circles left - these are the eyes and one slightly larger one - the nose. Next job A child can do it with his own hands. Looking at the hint diagram, all he had to do was correctly position and glue the parts of our cat on the sheet. And the mouth and mustache can be drawn with a black felt-tip pen. Here is such a simple cat applique.

Cut out patterns and make your favorite applications.

A cheerful fur seal will not leave any child indifferent, and a simple applique pattern will make its execution easy and accessible.
For this craft we will need:
scissors, with which we will cut out an oval and a triangle from black colored paper. Later they will turn into the body and tail of a fur seal. An oval made of gray paper cut in half is his flippers. The light gray circle is the head. Cut out a crown from yellow paper.Our fur seal performs in the circus, so he needs a pedestal. To do this, cut out three identical triangles, two of which will be the same color. Then the child himself will be able to glue all the details of the funny seal onto a sheet of paper. At the end of the work, do not forget to finish drawing the eyes and mustache of our circus performer, as well as cut out and glue the nose. The colors of geometric shapes can be changed at your discretion.


Dog applique
The dog applique is very easy to make. Even a student can do this craft. middle group kindergarten.
For this craft you will need: colored paper, glue, scissors, a black pencil or felt-tip pen and a landscape sheet.
Adults cut out two identical circles - this will later be the body and head of a faithful four-legged friend. Four semicircles will also be needed. We will make ears from two, and a tail from one. Let's put the puppy on a hummock - the last semicircle. Now let's give the baby a job. Let him carefully glue all the details onto the album sheet. At the end of the work, help your child draw the dog's eyes, nose and mouth.

The dog applique is ready. This puppy will guard your baby's sleep and become his faithful friend.

Applique Circus Magician
Everyone loves the circus. Therefore, we propose to make a Circus Magician applique with your own hands, which could always lift your spirits and have fun. For it you need to cut out a circle on light paper and draw eyes and a smile on it. Cut out hands from paper of the same color. Let's dress our Circus Magician in a formal black suit. To do this, cut out an oval and four triangles from black paper. His hat will be the same color - an oval, cut in half, and a rectangle. We make large shoes - cut the oval into two parts. The collar is a yellow star. And, of course, the magic wand is another five-pointed star figure. All that remains is to correctly place the details of our application on a sheet of paper, glue everything and make a wish.


Bird applique
Have you ever fed the birds bread crumbs in the park? Remember how your child enjoys this process. And every day he asks you to go to the park to feed the birds. What if it's raining outside? What to do? And everything is very simple! Make an applique of a bird to which your baby will give crumbs. A child can easily make this craft with his own hands.This diagram will help the child not to get confused in the actions, since the diagram will be in front of him all the time. After making the bird applique, you can feed it with bread crumbs. Also, the baby will happily play with this craft and the bird will never fly away from him.

Crab applique
We present to your attention a crab applique. It is very easy to do, so your child can do it himself.So that your child can easily and quickly complete the crab applique, you cansave the diagram. Right-click on the diagram and click save rice how?And let assembling the applique be a fabulous experience for your child!


Chicken applique
Appliques are interesting fakes that even small children can make with their own hands. And this is very good, since applications help children develop fine motor skills, perseverance and attentiveness. Who will the kids want to do first? Of course, those animals and birds that they learned to depict first. And among them, of course, are little chickens. Therefore, invite your child to make a chicken applique, believe me, he will readily agree. To applique the chicken you will only need colored paper, scissors and glue.


Duckling applique
“They want to be like the cheerful ducklings, they want to be like them, not in vain, not in vain...” Does your baby like to dance to this song? Then make this dance more interesting, like a theatrical action. To do this, you will need appliques of ducklings that will dance with your baby. The child will make this simple craft with his own hands.


Applique horse
If you want to develop your child correctly, do it with the help of crafts that your child can make with his own hands. A horse applique is such an easy-to-make craft. It's very easy to do. To do this, you only need colored paper, scissors and glue.Your baby will happily play with the horses.


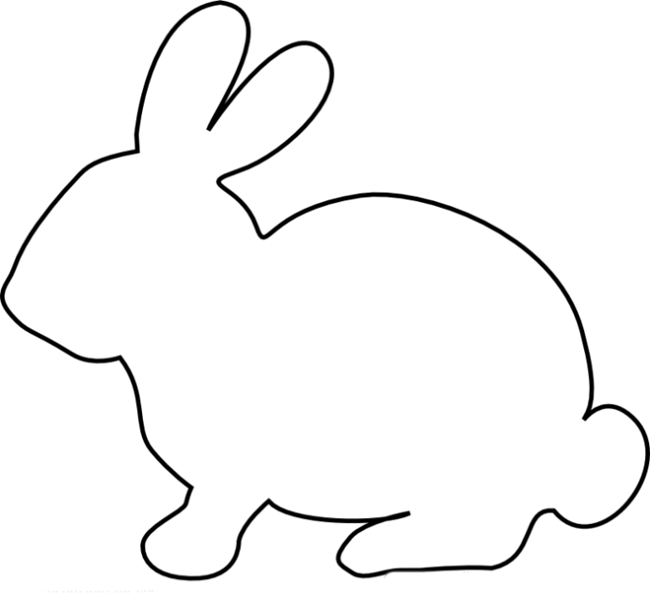
Bunny applique
Kids will love the hare applique for its simplicity and ease of making. Its scheme is quite simple. Two circles of the same size will become the head and body of our hare. The yellow star shape will serve as a beautiful collar. The ears of this little animal are an oval cut in half. To make the hare’s paws, just cut the oval into two unequal parts. The smaller part will become the front legs, and the larger part will become the hind legs. Now you need a sheet of paper on which the child will glue the finished parts of the hare. The eyes and nose can also be cut out and glued, or you can simply draw them with a black felt-tip pen. And don't forget the mustache. So our handmade hare applique is ready.


Oksana Seligeeva
Subject: « Design from geometric animal shapes»
Target: Consolidate knowledge about basic geometric shapes.
Tasks:
Educational: Build a skill designing animals from geometric shapes, ability to recognize acquaintances figures in illustrations.
Developmental: Correction and development of tactile perception, visual memory and mental operations by performing practical tasks.
Educational: Contribute to the development of interest in mathematics; develop independence; foster friendly relationships between children.
Logistics support: illustrations geometric shapes, illustration of Teremok, applications of fairy tale heroes, figures for making hare, plastic geometric shapes For didactic game "Wonderful bag", gingerbread.
Principles of extracurricular activities:
inclusion of students in active activities;
accessibility and visibility;
connection between theory and practice;
taking into account age characteristics;
a combination of individual and collective forms of activity.
Technologies used: gaming, health-saving, information and communication, multi-level learning technology.
Structure classes:
Introductory part – 2 min.
Main part – 20 min.
Final part – 3 min.
Progress of the lesson
1. Motivational stage.
The bell rang
Let's start our lesson.
Sit up straight, pull yourself up
And smile at each other!
Now, smile at me.
2. Updating knowledge.
Riddles about geometric shapes
Teacher: Children, guess the riddles. And having guessed them, we will find out what we will do in class.
After the children have guessed the riddle, the teacher hangs an illustration with geometric figure.
I have no corners
And I look like a saucer
On the plate and on the lid,
On the ring, on the wheel.
Who am I, friends?
Call me! Circle.
Three peaks
Three corners
Three sides -
Who am I? Triangle.
He's been my friend for a long time,
Every angle in it is right,
All four sides
Same length.
I'm glad to introduce him to you.
And his name is... square.
I look like an egg and just like the letter O.
I'm almost like a circle - a kid, I'm like a cucumber.
(Oval).
Trace the brick with chalk
Entirely on the asphalt,
And it will work out figure –
Of course you know her.
(Rectangle).
Teacher: Tell me in one word what it is?
Children: Geometric shapes
Didactic game "Wonderful bag" with a set of planar geometric shapes.
Teacher: And now I suggest you play a game. You need to put your hand in the bag and feel geometric figure, define and name what, this, for figure.
Teacher: What do you think we will do in class today?
3. Work on the topic
Teacher: The topic of our lesson design from geometric shapes. We will construct from geometric animal shapes.
And what kind animals you know?
Children: Fox, wolf, hare, bear.
Physical education minute:
On a hot day along a forest path
The animals went to water. (Children walk in a circle one after another.)
A calf tramped after the mother elk, (They walk, stomping loudly.)
A little fox was sneaking behind the mother fox, (They go stealthily.)
A hedgehog rolled after its mother hedgehog, (Move in a squat.)
A little bear followed the mother bear, (They walk swaying from side to side.)
The baby squirrels jumped after the mother squirrel, (They jump with their arms bent in front of their chest.)
Behind the mother hare are the slanting hares, (They jump, making "ears" from the palms.)
The she-wolf led the wolf cubs behind her. (They walk on all fours.)
All mothers and children want to get drunk.
Fairy tale dramatization "Teremok".
Teacher: What fairy tale is this house from? (illustration of the house is posted on the board).
Children: from a fairy tale "Teremok"
The teacher assigns roles to the students, having previously given them applications with the characters of the fairy tale.
Teacher: Stands in the Teremok field. A small mouse runs past. I saw a little mansion, stopped and asked:
Olya: Terem-teremok! Who lives in the mansion?
Teacher: Nobody responds. The mouse entered the little mansion and began to live there.
The teacher hangs the applique of a mouse-norushka on the board near the Terem.
Teacher: From which geometric shapes Is our little mouse made up?
Children: From circles and a triangle.

Teacher:A frog-frog galloped up to the mansion and asked:
Lina: Terem-teremok! Who lives in the mansion? (The teacher helps to pronounce in a way that children’s speech is difficult to understand for others.)
Olya: I, little mouse! Who are you?
And so, by analogy, all the heroes of the fairy tale are hung. Each character - application is analyzed from which geometric shapes consists.

4. Practical work children
Finger gymnastics:
One, two, three, four, five (we straighten our fingers one by one, starting with the thumb.)
The fingers went out for a walk,
One, two, three, four, five (We bend our fingers into fists one by one, starting with the little finger.)
They hid in the house again.
Teacher: Now children, you are on your own from geometric shapes collect a fairy tale hero "Teremok" bunny - runaway. Look carefully at the board where the bunny is depicted and make the same one.
The teacher lays out the parts of the hare on the desk.
Independent work of children in a group.
Teacher: What a beautiful little bunny you have turned out to be a little runner!
Teacher: What did we do on class? Which we used geometric shapes, when did they lay out the hare? What did you like about the lesson?
You guys are great today!
Reflection.
Teacher: The bunny really liked how you worked in class today, so he wants to treat you to gingerbread.
Publications on the topic:
Lesson summary “Journey to the land of geometric shapes”“Journey to the land of geometric shapes” Goal: To consolidate the ability to find one or many objects in a specially created environment and use it.
 Application “Traffic Light” Purpose: to teach children to perform applique work from geometric shapes. Objectives: developing skills in children.
Summary of a lesson on the development of visual perception in the preparatory group “Construction from geometric shapes” Summary of a frontal lesson on the development of visual perception in a preparatory group for school on the topic: “Construction from geometric ones.
Summary of an open lesson in mathematics “In the kingdom of geometric shapes” Municipal budget preschool educational institution d/s No. 1 “Bell” Synopsis open class in mathematics Topic: ".
Tangram is an ancient oriental puzzle made from figures obtained by cutting a square into 7 parts in a special way: 2 large triangles, one medium one, 2 small triangles, a square and a parallelogram. As a result of folding these parts together, flat figures are obtained, the contours of which resemble all kinds of objects, from humans, animals to tools and household items. These types of puzzles are often called "geometric puzzles", "cardboard puzzles" or "cut puzzles".
With a tangram, a child will learn to analyze images, identify geometric shapes in them, learn to visually break an entire object into parts, and vice versa - to compose a given model from elements, and most importantly - to think logically.
How to make a tangram
A tangram can be made from cardboard or paper by printing a template and cutting along the lines. You can download and print the tangram square diagram by clicking on the picture and selecting “print” or “save image as...”.

It is possible without a template. We draw a diagonal in the square - we get 2 triangles. We cut one of them in half into 2 small triangles. Mark the middle on each side of the second large triangle. We cut off at these marks middle triangle and other figures. There are other options for how to draw a tangram, but when you cut it into pieces, they will be absolutely the same.
A more practical and durable tangram can be cut from a rigid office folder or a plastic DVD box. You can complicate your task a little by cutting out a tangram from pieces of different felt, stitching them along the edges, or even from plywood or wood.
How to play tangram
Each piece of the game must be made up of seven tangram parts, and they must not overlap.
The easiest option for preschool children 4-5 years old is to assemble figures according to the diagrams (answers) laid out into elements, like a mosaic. A little practice, and the child will learn to make figures according to the pattern-contour and even come up with his own figures according to the same principle.
Level one - download and print the color tangram, this will make it easier to navigate the diagram.


Schemes and figures of the tangram game


Recently, tangrams have been often used by designers. The most successful use of tangram is perhaps as furniture. There are tangram tables, transformable upholstered furniture, and cabinet furniture. All furniture built on the tangram principle is quite comfortable and functional. It can change depending on the mood and desire of the owner. How many different options and combinations can be made from triangular, square and quadrangular shelves. When purchasing such furniture, along with instructions, the buyer is given several sheets with pictures on different topics, which can be folded from these shelves.In the living room you can hang shelves in the shape of people, in the nursery you can put cats, hares and birds from the same shelves, and in the dining room or library - the drawing can be on a construction theme - houses, castles, temples.
Here is such a multifunctional tangram.


 Which letter sh is hard or soft")